

Let me start with a disclaimer – Andrew and I are in no way an authority on furniture painting. This was our very first attempt at a big furniture redo. You can read about the dresser we thrifted here. It turned out great so I am going to share it!
Some things you should know before you begin:
1. DIYing furniture requires some research. We read a TON of articles before we ever started or bought the first supply. We also talked with the owner of the thrift store where we purchased the dresser as well as our dependable Home Depot paint man. Between these resources we felt confident in pressing forward. Without them we would have ended up with a big old mess. Some articles we found helpful can be found by clicking here and here. And also here.
2. DIYing furniture can sometimes be as expensive as buying new, especially the first time. We began with zero supplies so we had to buy EVERYTHING. The total cost of our dresser+supplies was around $120. This is much less expensive than the pieces of furniture we like that are new; however, it wasn’t “cheap” (by our standards).
3. DIYing furniture is not for the faint of heart. We quickly learned that if we wanted our dresser to look good we had to be patient and take our time. We ended up spending about 10 straight hours out on our HOT driveway working on the dresser from start to finish. At the end we were both sun-burnt and exhausted. I even had a bleeding wound on my finger from the paintbrush!
How We Painted a Thrifted Dresser:
1. We purchased supplies. For this project we used a sanding block, 5 different paint brushes (2 cheap ones for primer and 3 good ones for paint), oil-based primer, mineral spirits, and 1qt of latex semi-gloss interior paint. I forgot to take a picture of it but we used Swiss Coffee by Behr.
 |
| Our little setup. |
 |
| We used Kilz Original primer in white. |
 |
| These are the cheapo primer brushes. The paint brushes were "best" quality rather than "good." |
2. We lightly sanded the dresser to remove the sheen from the old finish. We didn’t have to sand it like crazy, just enough to take the gloss out. The primer is the main work-horse for getting the paint to stick.
 |
| Sanded and no longer shiny. |
 |
| Sanded drawers. Gotta love those nooks and crannies! |
3. We wiped the dresser down thoroughly with a damp cloth and let it dry completely. This step is really annoying but important. If you skip it, you will wind up with a gritty surface from the sanding particles. I also hit the insides of the dresser and drawers with a round of Febreze. I have no idea if it did anything but I could not stand the musty smell it had!
 |
| Wiped off and fresh as a daisy. |
4. We used cheapo brushes and applied a very thin layer of primer to the entire dresser. We used brushes that we intended to throw away because the oil-based primer is nearly impossible to get out. The primer layer needs to be so thin that you can still see the old finish peeking through. For those of you who bake, this is like the crumb coat when you are icing a cake.


5. Once the primer was completely dry, we applied a very thin first coat of paint. As you can see in this picture, the top drawer is primed and the bottom drawer is primed+one coat of paint. That first coat should be so thin that you can STILL see the old finish barely peeking through.


6. We then applied 4 more very thin coats of paint, allowing the dresser to dry completely between each coat. We also sanded rough spots between coats which helped the finish remain smooth and even. I can’t stress how important it is to apply several very thin coats rather than a couple thick coats. The finish will look more professional and will be a lot stronger. Here is a little before and after action!
 |
| Before. |
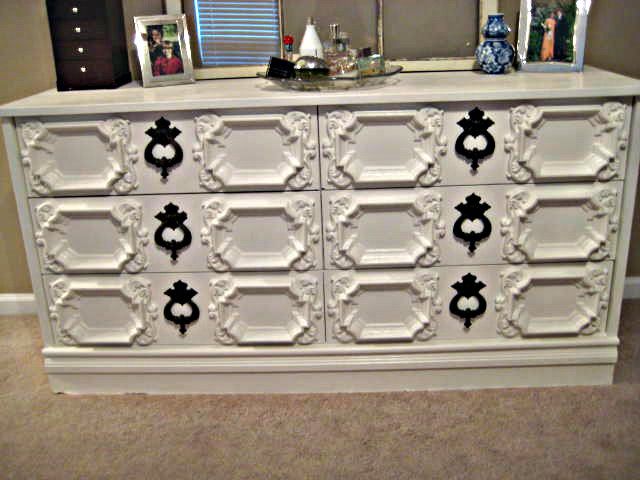 |
| After! |
We had a good time with this project and are very happy
with the result. I think we will love it throughout our time in
New Orleans and beyond! Send me a message or leave a
comment if you have any questions or TIPS for painting
furniture. Knowledge is power and hearing from
you only makes us better DIYers!
Amazing!!! I do things like this too...I would much rather have something like this than something brand new. It has so much more character. I am proud of you! You rocked this. :)
ReplyDeleteVivian
Great job!
ReplyDeleteGreat Job! Isn't this fun to do!!! I just refinished (painted) a dressing table, and it was so much fun! Think I have the fever to do some more! Your dresser is unique and a one of a kind....that is special! Oh...I don't think you need any tips from me, but when I have to sand or even when I start to paint I HAVE to have a package of 'Tack Cloths'. It is sticky and removes all the loose bits from sanding or any thing that would not make your paint smooth and pretty. Enjoy your great hard work!!! Betty Bridges
ReplyDelete